How To Remove CPU From Motherboards: A Step-by-Step Guide

There are several purposes why it is crucial to learn how to remove CPU from motherboards.
If you're experiencing failure of operations or constant freezing after using the PC after a couple of minutes including when gaming, your CPU might need a replacement.
Another reason is if the motherboard's socket can operate a faster processor than the current one, you may need to upgrade.
Removing a CPU from a motherboard is not a complex job.
Still, it must be done with caution to avoid damaging or ruining a working processor.
What You Need To Do First
Removing or installing components on your PC is an important aspect to learn.
Before you start removing the CPU from your desktop, there are a few actions you need to take but always start with turning it off.
ALSO READ: How To Remove GPU From Motherboard
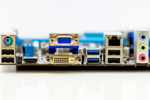
1. Disconnect All Cables From the Case
To make the removal significantly safer and easier, you need to unplug all your PC case connections.
Look at all the wires connected to the front and back of your case and start properly removing all attached cables.
Start with the power cord, which is the one that connects to the AVR.
It is usually the thickest wire and is located at the top back part of the PC case.
Next, remove the network cable. This cord is the one that connects your desktop to the modem.
If you're using a wireless network adapter, then proceed to other peripherals.
Disconnect the monitor, mouse, keyboard, speaker, or headset, any external storage connected, until there are no attached wires left.
2. Get Your Tools
Like with most peripherals, you need a screwdriver.
Better yet, a good set of screwdrivers to loosen or lock the components into place effectively.
You should also consider wearing an ESD or antistatic wristband or step on an antistatic mat.
If you don't have one, you can prevent static discharge by touching a metal part on the casing regularly while working.
3. Remove Side Panel
To access the internal space of your desktop, you have to open the PC case.
Depending on the screws used in your PC case, you can either use a screwdriver or utilize your fingers to remove the screws.
Once you removed the screws, slide or nudge it to the left until you're able to detach the panel completely.
If your side panel includes a built-in fan, detach it from the motherboard before putting it away.
4. Leave the PC Unplugged (Optional)
To ensure that your processor is free from heat when you remove it, don't connect your PC to any power source for at least two to three hours.
On the other hand, it is safe to remove the CPU even if it's plugged as long as the computer is turned off for hours.
Compared to other peripherals, the processor is a very fragile component.
You can immediately remove RAM sticks, video cards, drives, and even PSU once the PC is turned off but not the CPU.
Some professional builders might suggest that it should be fine regardless, but it's always a good practice to be careful.
5. Clean Your PC (Optional)
It's not a requirement to remove the accumulated dust inside your computer whenever you remove the CPU.
That said, routinely cleaning your PC is a good practice.
Depending on where your system is situated, you should dust your computer's internal parts every two to three months.
Dust may be causing your computer to function slowly or make a lot of noise while it tries to work.
It is drawn in by your system's intake fan, along with the airflow that cools the inside parts.
The dust then accumulates on the components of your computer, trapping heat.
That can lead to overheating of your CPU and other components if you let too much dust stay inside for a long time.
If you're experiencing issues with your computer, among the possible solutions is simply cleaning its interior.
That is why you must see the inside of the case now and then, not only when replacing or installing parts.

How To Remove CPU from Motherboards
1. Remove CPU Cooler
Start by gently nudging the cooler in one direction until you feel some resistance.
Once you feel that hindrance, make the motion in reverse until you encounter another resistance.
In other words, use a very delicate back-and-forth twisting maneuver to remove the cooler.
You shouldn't have too much difficulty loosening the cooler and then lifting it completely.
If the heat sink appears to be stuck to the CPU, you may have to warm the thermal paste a bit.
Warming the thermal paste using a heat gun might work but be careful not to overdo it.
You can also try nudging it very gently to loosen it but again, don't apply too much force when you make the motion.
If you pull the cooler too aggressively, the CPU will be yanked out of its socket.
This can damage both the CPU and the connector.
Once a pin stays within a socket, your motherboard gets permanently damaged because you cannot replace the socket.
With these possible scenarios, always make it a point to apply delicate pressure whenever you handle CPU components.
2. Remove Thermal Paste
If you plan to resell or give the current CPU cooler and the CPU itself, make sure the thermal paste from the cooler's base is removed.
After you've removed the CPU cooler, the actual processor is entirely visible.
When you're in this part, it's an excellent time to wipe off any leftover thermal paste from the CPU.
Wipe off any remaining thermal compound with a microfibre cloth gently.
If the paste is too concentrated, try heating the processor a bit using a heat gun or hairdryer.
The high temperature will soften the thermal paste, which allows it to be less resistant.
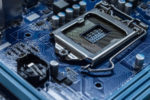
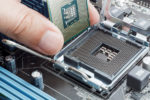
3. Remove Processor
To lift the processor off from the motherboard, carefully pull the zero insertion force or ZIF lever to unclamp it and lift it out.
In most cases, the CPU should pop out of the socket easily and without requiring any action from you.
If the processor didn't move for some reason, you could lift it slowly while holding it with just enough force.
The processor is attached to the motherboard via extremely fragile pins, so handle it with utmost care.
If you broke a pin, the CPU becomes permanently unusable, so be cautious when removing it if you plan to utilize it in the future.
How To Install a New CPU
Unless you're going to disassemble every component your PC has, you need to replace the processor you removed.
1. Place the Processor
You can unwrap the replacement CPU from its packing and gently place it immediately into the empty processor slot.
The chip can only go in one direction, so you need to be aware of the indicators in the corners to ensure precise alignment.
You need to lower the lever to secure the CPU into place once it's fitted in smoothly.
If you're having trouble, chances are you made a mistake in the alignment.
You'll have to lift the CPU gently and try in a different direction until the alignment is correct if that's the case.
2. Apply Thermal Paste
Thermal paste, often known as thermal grease, is essential for transporting heat from the CPU to the cooler's heatsink.
Squeeze a droplet onto the center of your new CPU, but don't put too much on.
You only need something like the size of a small seed to cover the surface area of the processor.
Don't be misled by one of the infamous PC building videos on the internet by a company called "The Verge."
This video earned critical reactions from new, casual, and veteran technicians because the builder in the video applied too much thermal paste.
When reattaching your cooler to your PC, you can use various tools to distribute the thermal paste, but it's more natural to use the heatsink that came with it.
Please be aware that thermal paste is commonly pre-applied on new CPU coolers, and adding extra could cause problems.
3. Finishing Up
The majority of coolers are screw-based.
Thus, all you have to do is make sure you're using the correct bracket for your motherboard's connector, align and secure the screws.
After you've applied the required amount of thermal compound, you need to secure the CPU cooler carefully.
You can accomplish this by making sure that the cooler is facing horizontally to the motherboard.
Some CPU coolers are attached with pins or tabs as their locking mechanism, while others are mounted at an angle in line with metal tabs.
Before finishing the CPU cooler installation, carefully press it down to uniformly distribute the thermal compound in a small circular motion.
Don't forget to attach the cooler to the CPU fan connector on the motherboard after you've installed it.
RELATED: How To Install SSD on Motherboards (Guide)
Conclusion
How to remove CPU from motherboards and reinstalling a new one are some of the most delicate processes of PC building.
As such, be prepared and informed as possible to ensure that you're doing it the right way.