How To Clean Motherboards and Make Them Last Longer

The motherboard provides all the connections between the different components of your computer.
As such, it is the busiest piece of hardware you can find inside your PC setup.
With all the processes and tasks that circulate the motherboard, keeping it in its best condition is important.
One way to maintain computers is by learning how to clean motherboards.
If you get the hang of it, you might even make PC-building a hobby or a secondary income stream.
This brief will discuss essential tools, materials, and easy-to-follow procedures for cleaning motherboards.
How To Clean Motherboards
Over time, dust and dirt will accumulate inside your computer enclosure.
Without regular cleaning, many parts of your computer will eventually begin malfunctioning, especially the mechanical parts.
Overheating can also become an annoying problem, and your PC won’t run to spec as usual.
When we talk about cleaning motherboards, we like to look at it as cleaning a whole computer.
After all, you won’t be able to clean your motherboard thoroughly without dismantling it from the computer chassis.
That is unless, of course, if you are trying to clean a motherboard from storage.
Cleaning a motherboard is as easy as brushing off dust and dirt.
It can also be as complicated as picking the particles from tiny, unreachable crevices.
Also, depending on how you use or work around your computer, other substances can accumulate inside your computer.
ALSO READ: How To Connect Power Supply To Motherboards?
Things To Prepare
Before heading onto the methods and procedures, let’s list the essentials to make the cleaning process a breeze.
Overall, you will need the same tools for installing, assembling, or dismantling a desktop computer, in addition to cleaning tools.
- Stable, Well-Lit, and Grounded Worktop
If you check our motherboard installation and replacement guides, you will find that a stable, well-lit, and grounded worktop is very important.
Since cleaning a motherboard requires working on delicate electronics, your workstation must be stable and wide enough.
Additionally, with bright light, you will be able to identify dust and dirt from the small components of the motherboard.
Another important thing when working with motherboards is proper grounding.
With proper grounding, you can avoid an electrostatic discharge (ESD) that can damage the motherboard.
If you don’t have an ESD wristband, a rubber grounding mat should do the trick.
- Precision Screwdrivers and Tweezers
If you have assembled your computer, there is a good chance that you already have the exact tools for dismantling it.
A set of precision screwdrivers and some small tweezers can be beneficial.
- Compressed Air Cleaner
You can purchase compressed air cleaners from your nearest home center, electronics store, or hardware.
Sometimes also called “canned air,” “dusting gas,” or “air duster,” compressed air cleaners come in lightweight spray canisters to replace the not-so-portable air compressors.
Most retail air dusters contain difluoroethane, a flammable substance that ignites when exposed to a spark or flame in its liquid form.
Difluoroethane has a lower global warming potential than its predecessor, tetrafluoroethane.
You can use an air compressor as an unlimited and eco-friendlier alternative to canned compressed air dusters if you have one at home.
However, consider that too much air pressure can dislodge some of the components soldered onto your motherboard.
- Soft-Bristled Brush
Imagine how archaeologists unearth relics and bones.
When a discovery is surfacing, they use different brushes to remove the dirt and debris until only the item in question remains.
The brushes remove everything not connected to the item, and it is soft enough not to damage the item itself.
Similarly, a brush can remove most of the dust, cobwebs, and dirt sitting on the surfaces of your motherboard.
All you have to do is brush every nook and cranny with minimal effort.
- Cotton Swabs
Cotton swabs or Q-tips work like brushes, and they are even smaller.
If you find a hard-to-reach spot that needs some cleaning, you can dab a cotton swab onto its crevices.
That said, you should know that dry cotton can separate from the tip of the swab and adhere to the edges on your motherboard.
It is better to clean dust and dirt with cotton swabs if the cotton is damp.
Enter isopropyl alcohol.
- Isopropyl Alcohol
If you want to dampen some cotton swabs to clean your motherboard, do not use water.
Water may contain some minerals and salt compounds that can make the liquid highly conductive and damaging for the circuitry of your motherboard.
Instead, use isopropyl alcohol with a high concentration, at least 90 percent.
Isopropyl alcohol is a volatile liquid that readily vaporizes in small amounts and does not conduct electricity.
- Protective Gear
If you plan to use compressed air, you can protect your face from dust and debris by putting on some goggles and wearing a dust mask.
Compress air will easily disperse the dust and dirt that can become eye, nose, and throat irritants.
- Vacuum Cleaner
We do not advise using a vacuum cleaner, especially a particularly strong device since it can dislodge lightly soldered components on your motherboard.
A vacuum cleaner can come in handy for collecting all the dust and debris scattered by compressed air.

Step-by-Step Cleaning Guide
Now that you have your tools prepared, you can proceed with the following steps to bring back your motherboard to tiptop shape.
- Step #1
Turn off your computer and unplug it from the power outlet.
- Step #2
Disconnect all wires and cables attached to your computer case's front and rear panels.
- Step #3
Transfer your computer to your chosen stable, well-lit, and grounded worktop.
- Step #4
Ground yourself for at least 30 seconds.
If you do not have an ESD wristband or a grounding mat, this step is essential.
Touch a metal object connected to the built-in components of your house to dispense all the static electricity in your body.
Excellent examples include a faucet, a metal pole, or a metal handrail.
- Step #5
Open your PC case. Use your screwdrivers to remove the cover panel of your computer.
Be sure to remember which screws go where, especially if not all the screws are the same.
- Step #6
Detach all easily accessible connectors.
Sometimes, detaching the connectors can allow you to access and clean hard-to-reach places on your motherboard.
- Step #7
Remove all attached expansion cards, especially large graphics cards.
Expansion cards can block large portions of the motherboard, making it difficult to clean the whole thing.
Unlatch or unscrew the large expansion cards, and remove them from the motherboard.
Doing this will free up enough space so that you can reach and remove dust and dirt from hidden gaps.
- Step #8
Use the compressed air to dislodge or soften the dust and dirt particles sitting on the surfaces of your computer’s components.
- Step #9
Use the soft-bristled brush for the dust and debris that are more difficult to remove.
- Step #10
Finally, dab some cotton swabs in isopropyl alcohol, and use them to remove some sticky stains accumulating on your motherboard.
Cleaning a Motherboard Without Compressed Air
While you can use the following method for cleaning without compressed air, it is also the best way to make a deep and thorough cleaning.
Skip Step 5 through Step 10 in the previous section and replace it with the following steps:
- Step #5
Open all sides of your computer case or detach all other cover panels.
In most computer enclosures, the front panel and both side panels are removable.
Taking out all removable covers gives you access to more wires, cables, and connectors, and it lets you unscrew the CPU and the motherboard itself.
- Step #6
Disconnect all the connectors, but remember where each one goes so you can connect them to the correct slots.
- Step #7
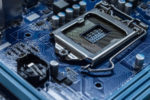
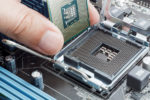
Remove all attached components, including expansion cards, storage devices, memory modules, cooling peripherals, and the CPU.
- Step #8
Detach the motherboard from the computer case, and lay down all separate computer components on your worktop.
- Step #9
With a soft-bristled brush, gently remove dirt, dust, and debris from all computer parts in front of you.
- Step #10
Finally, dab hard-to-remove stains with damp cotton swabs dipped in isopropyl alcohol.
Before putting everything back together, be sure that everything is dry.
Also, don’t forget to clean and replace the thermal compound on your CPU cooling fan before putting it back.
RELATED: How to Choose a Motherboard? (Guide)
Conclusion
Cleaning a motherboard and other computer components can be very tedious.
That said, if you know how to clean motherboards and do them regularly, your computers will surely have an extended lifespan.
Using a canned compressed air cleaner is the fastest and safest way to go.
Still, it will not be enough for a thorough clean.
It doesn’t matter if you have the best gaming motherboard available on the market, it will still accumulate dust and dirt like any other object in your house.