How to Install a Motherboard: Complete Guide

Building your first computer can entail tiresome procedures, but it can be exciting and rewarding at the same time.
Besides getting to pick the parts you want, you would better understand how your computer components function together.
If you know how to install a motherboard, it can be good practice for maintaining your computer.
You can keep it clean when you want, and you can experiment with several components at different times.
Additionally, learning how to install motherboards means you’ll have better knowledge about installing motherboard attachments.
Is It Easy To Install a Motherboard?
Installing any motherboard attachment is very easy.
Once you know how to install a CPU, GPU, storage drive, or RAM module, you can compile a list of your version of motherboard installation procedures.
Motherboard installation takes some time, though, and it requires a certain level of technical understanding.
Before anything else, brush up on technical information by reading about PC components and the different parts of a motherboard.
Learning how to install motherboards can be tricky for some.
However, with enough information, the proper tools, and the utmost care, the practice can be relatively simple and easy.
ALSO READ: How To Install Motherboard Drivers
How To Install a Motherboard and Set It Up
Although a motherboard can have very rigid construction, its complexity can make it quite delicate.
This article can help you understand the tools, the installation steps, and the BIOS setup procedures.
What Tools Should I Have?
When installing a motherboard, essential tools include a set of precision screwdrivers, tweezers, plastic containers, a flashlight, and some small cable ties.
Computer components are prone to damage from electrostatic discharge (ESD).
Like the minor shock you get from touching woolen fabrics and metals simultaneously, ESD happens when working on a motherboard.
Electrostatic discharge can damage motherboard components even without you feeling it.
If you plan to work on PC components several times, it is advisable to own an ESD wrist band and a grounding mat.
What Are the Basic Steps of Installing a Motherboard?
You might think that installing a motherboard is a long, tedious process.
Carefully read these steps, and notice how things are relatively straightforward once you get the knack for it.
Use your flashlight to have a clear view of a particular task at any point in the installation process.
Step 1: Prepare your workspace and take safety precautions.
Gather and organize your tools on a stable, non-conductive worktop free of any obstructions and unrelated materials.
If you have a grounding mat, lay it over the worktop before positioning your PC case.
Safety protocols are more inclined towards preventing damage to components of the motherboard.
Since you will be working on assembling, no components should be connected to an electricity source.
Prevent damaging your motherboard with ESD by discharging all electrostatic charges in your body.
To do this, ground yourself by wearing an ESD wrist band, or touch any metal object attached to a built-in fixture or furniture.
Also, avoid working close to carpets or woolen fabrics.
Step 2: Open up your computer case and detach the I/O shield.
Remove or unscrew the side panel of your PC case, and do the same with the rear blanking plate.
Keep screws on a rigid plastic container, and remember which screw goes where.
To make things easier, sort the screws and keep similar ones together.
Step 3: Unpack your motherboard and attach all standoffs.
Open the box and take the motherboard and included connectors out carefully.
Take out the motherboard pegs, risers, or standoffs.
If you chose the motherboard, you should know its form factor, and you should be able to locate the correct attachment points on the PC case.
Next, screw the standoffs into the correct positions in the computer case.
Step 4: Remove unnecessary metal covers from the I/O shield and reinstall.
Take the rear blanking plate and check it against the rear I/O panel of the motherboard.
Remove all blanking plate metal covers blocking the connectors on the rear I/O panel.
Once the I/O shield is free of all unnecessary metal covers, screw it back into the PC case.

Step 5: Attach the motherboard into the case.
Carefully slide the motherboard into the standoffs on the PC case.
Check that all the screw holes of the motherboard have standoffs underneath.
If some screw holes have no standoffs, you may have attached them in the wrong place.
After securing all the attachment points, notice how the board may be slightly off from the standoffs.
This slight bend is probably caused by the I/O shield pushing against the motherboard.
Line up the rear connectors with the I/O shield with a gentle nudge on the board.
When everything is aligned, screw the motherboard in place.
Step 6. Install the CPU, power supply, and RAM in that order.
Installing a motherboard does not end after it has been screwed into place.
Complete motherboard installation involves getting through a successful power-on self-test (POST).
All other components have to be installed to achieve a complete POST.
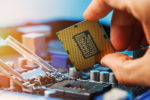
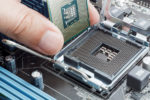
Locate the CPU socket on the motherboard and lift the latch lever to release the socket cover.
Be sure you have a compatible CPU for the particular motherboard you have.
Check out AMD AM4 socket motherboards in contrast to LGA 2066 boards to see the difference.
Seat the CPU by aligning its notches with positioning markers on the motherboard.
Then, secure the socket cover over the CPU, and install the CPU heatsink and cooling fan.
Attach the power connector of the cooling fan to the appropriate header on the motherboard.
After, locate the mounting points at the bottom of your PC case, and screw the PSU in place.
Once that’s done, attach the 24-pin and eight-pin power connectors into the corresponding slots on the motherboard.
Open the lock clips of the RAM slots and then seat the RAM modules firmly into the slots. The clips should automatically lock as you place the modules.
Step 7: Install the graphics card.
To install the graphics card, remove expansion slot covers on the rear of your PC case from the exact area where the GPU will sit.
Seat the graphics card by pressing it down onto a PCIe x16 slot.
After doing that, screw the graphics card in place, and connect any required power connectors from the PSU.
Step 8: Mount the storage and optical drives.
Your computer case has storage bays located in its lower front portion.
The exact mounting procedure for hard drives and solid-state drives varies from PC case to PC case.
Mount the drives into the storage bays using their respective mounting screws.
Connect all the storage drives to the correct slots on the motherboard using SATA cables.
If you have an optical drive, install it in the upper front portion of the PC case and connect using a SATA cable to another SATA port.
Step 9: Mount cooling systems and attach all remaining connectors.
Mount all case fans within the PC case using the included clips or screws.
Multiple fan headers are positioned in different parts of the motherboard.
Connect each fan to the closest power supply header on the board.
Finally, identify all remaining top, front, or side panel I/O connectors, and attach them to the correct slots on the motherboard.
Step 10: Organize internal cables and close the computer case.
To complete PC assembly, organize and secure all wires using cable ties, and secure the PC case side panel with its screws.
You can skip this step if you want to make sure everything works before closing everything.
Proceed to the next section for BIOS setup.
How Do I Setup My Motherboard?
Complete setup requires installing motherboard components for checking.
If you just want to attach a motherboard, you can stop with Step 5 in the previous section.
However, if you want to check complete functionality, proceed with the following steps.
Step 1: Connect peripherals.
Connect primary I/O peripheral devices to your computer, including the mouse, keyboard, and display monitor.
Step 2: Plug it in.
Plug the device into a power socket and turn it on.
Step 3: BIOS
Hit the BIOS hotkey before the power-on self-test ends.
Step 4: Check for problems.
Set all undetected values and correct attachment or installation of components that BIOS does not detect.
Checking the alignment of undetected components means shutting down the PC, confirming part alignment, and restarting the BIOS setup.
Step 5: Save.
If all settings are optimal and BIOS detects all components, save the settings and exit the interface to proceed to the primary operating system.
RELATED: Motherboard HDMI Not Working (Guide)
How Do I Install a New Motherboard?
For a more informed approach, read about all the other computer components before learning how to install a motherboard.
Also, take a closer look at the different parts of a motherboard.
Understanding the functions of each of the parts makes installation a whole lot easier.
Don’t forget about safety procedures when trying to handle computer components, too.
Before handling any computer components, discharging all electrostatic charges is as easy as grounding yourself to a metal tap or standing on solid ground.
You wouldn’t want to put a brand-new high-end gaming motherboard to waste just because of some static electricity, right?
Finally, only install a new motherboard under sufficient lighting.
Risks of attaching connectors to the wrong slots may occur under dim conditions, and this can damage connector pins and PC components.