How To Install Motherboard Drivers

As a beginner DIY PC builder, knowing how to install motherboard drivers ensures that your system functions properly.
Also known as chipset drivers, they are primarily responsible for controlling all of the major functions of your computer system.
Basically, they are the software interface that allows your computer’s motherboard to communicate with the operating system.
As you can imagine, it is very important that you make sure your motherboard drivers are up to date.
Before we talk about that, let’s start with the basics first. What are motherboard drivers and how do they work?
How Do Motherboard Drivers Work?
Motherboard drivers act like software systems. Think of them as the “brain” of your motherboard.
These drivers relay signals or instructions to the different components of your computer so that they can all work together efficiently.
Motherboard drivers perform the role of providing additional information about a specific hardware model.
You can also think of these device drivers as the “translators” between the device and the programs used by that particular program.
They explain the operation you want the specific hardware to perform.
For example, if you install a Bluetooth card on your mainboard, a driver ensures that the Bluetooth connection will be enabled when you access your computer.
With the help of various drivers for motherboards, specific programs will know how they should work together.
ALSO READ: How to Install SSD on a Motherboard
How To Install Motherboard Drivers
Whether you’re building a new rig, upgrading an old setup, or just want to keep your computer up to date, knowing how to install motherboard drivers is important.
Fortunately, doing it is much easier than many PC-building beginners think.
Step 1: Determine the Drivers You Need
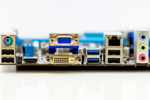
As you probably already know, your motherboard is unique to the make and model of your PC.
Hence, you’ll need to determine the exact brand and model of your PC’s motherboard to find the right drivers.
How do you know the exact model of your board? Here’s what you need to do:
- Go to Start or press the Windows logo key on your keyboard and type System on the search bar.
- Select System Information and click on System Summary from the options in the left pane.
- Under Baseboard, you will see the information you need.
These are the Manufacturer’s Name, Product Code, and the Version of your motherboard. Take note of them.
- If you’re only interested in installing drivers for specific components of your motherboard, such as Bluetooth, Wi-Fi, or the RAM, select Components from the tree in the left pane.
Choose the component you need and then look for the Driver in the Item field.
The information in the Value field will show you the path and name of the driver file.
Step 2: Search and Download the Driver
Once you have the information you need, it’s time to search and download the motherboard drivers you’re looking for.
To get the driver files, all you need to do is download and install the latest drivers from the manufacturer’s website.
Each manufacturer’s website typically has a page dedicated to drivers.
You simply have to search what drivers you need using the product information you have noted during the first step.
Often, you will be asked to provide the driver model number, computer model, or the service code of your motherboard or the component.
Once you find the motherboard driver you need, click on the Download button next to that file.
When it finishes downloading, locate the file on your computer, which will normally go straight to the Downloads Folder.
Drivers often come in a .exe file. If a driver contains several files, it will download as a .zip file.
If it’s the latter, you will have to extract the files first before running and installing them.
When extracting .zip files, choose a location where you want to save the files and then select OK.
Step 3: Install the Drivers
At this point, you are ready to run the drivers. Go to the folder where your downloaded driver files are.
Next, right-click on the file and select Run as Administrator. This will launch the driver installation wizard.
Just click on Next until the installation completes.
If the drivers were pre-installed on your PC, you might see options like Modify or Repair to update the existing driver.
At the end of the installation process, you will see a Finish button.
In most cases, you will be instructed to restart your computer for the changes to take effect. Do this as soon as possible.

Good To Know
Modern operating systems, like Windows 10, come with pre-installed motherboard drivers.
Therefore, you can use your computer right away after setting it up.
Then, there are specific motherboard models that require you to install chipset drivers to maximize their features and help other hardware components work properly.
Furthermore, motherboard manufacturers periodically release updates to their drivers.
These updates are necessary to improve the motherboards’ performance, stability, and compatibility with newer devices or components.
Regular updates also support features that weren’t available in specific boards when they were first launched.
The best drivers for most motherboards are the latest ones, which means you have to check for updates from time to time.
Now, let’s talk about how and when to update your motherboard drivers.
How to Update Motherboard Drivers
Since it’s not always clear how or when you should update them, dealing with device drivers can feel like a headache.
Sometimes, when your system catches malware or viruses, your motherboard and other device drivers can get corrupted.
More often than not, this means you will have to update or reinstall them.
How to Check for Updates
One of the easiest ways to ensure your system runs smoothly is to check that your motherboard drivers are always up to date.
There are more than a few tell-tale signs that your motherboard drivers need updating.
Pay attention to when you start noticing problems in your computer, such as sudden crashes, slow performance, bugs, or error messages.
On the other hand, you can also check for available updates manually.
To do this, follow these steps:
Step 1: Go to the Settings app and select Update & Security.
Step 2: If your system isn’t up to date, you will see a prompt or button to check for updates.
It will show you a list of drivers, security patches, and any other updates found.
Step 3: From there, you can download and install the needed drivers.
Make sure you are connected to the internet.
Other Ways to Install Motherboard Drivers
Aside from installing drivers from the manufacturer’s website, you can also install motherboard drivers from a CD or a USB device.
Install Drivers From a CD
To install a driver from a disk, insert the CD into your drive. Next, go to Device Manager.
From the list, you will see the motherboard name. Right-click on it and choose Update Driver.
Navigate the options and follow the instructions shown on the wizard app to install the driver.
Install Drivers From a USB
You can also download the drivers from the manufacturer’s website onto a USB device.
Then, connect the USB drive to your computer. Open the driver files and follow the prompts to install them.
How to Set Automatic Driver Update
An easy way to keep your motherboard drivers updated, along with the rest of your computer hardware component drivers, is to enable automatic updates.
Often, automatic updates are a default setting in Windows computers.
However, if you notice that your system drivers aren’t updating on their own, you may need to turn on your Windows Update manually.
To do this, go to Settings, select Update & Security, and then click on Windows Update.
Go to Advanced Options and choose Automatic as the setting.
Most Common Motherboard Drivers
As mentioned, motherboards can have different drivers.
The main driver for motherboards is for the chipset, which includes the basic functionalities of the board.
Higher-end motherboards come with additional features that also require separate drivers to stay updated.
Below are some common types of motherboard drivers that need to stay updated to unleash the full potential of your rig:
Network Driver
The network driver ensures that you can seamlessly connect to other devices like your laptop, smartphone, tablet, and others.
Sound Driver
It is an important component of the motherboard that helps send audio information to some output audio devices, like speakers and headphones.
Video Driver
The video driver allows the graphics-mode application program and the operating system to communicate with each other.
Wi-Fi Driver
Some motherboards come with Wi-Fi. This driver supports functions like management and configuration.
RELATED: How to Install a Motherboard (Guide)
Final Thoughts
Like any other hardware component in your computer, your motherboard needs drivers to function properly.
These drivers need to stay updated so that you don’t run into problems while gaming or during other tasks and maximize the full potential of your motherboard.
The problem is, motherboard manufacturers don’t have a regular schedule for when they are releasing updates.
Roughly speaking, it can be anywhere from a week after or a few months.
Your best bet is to set your system to update the drivers automatically instead of downloading and installing them manually.